Thanks to Tyson Munro from United Cycle in Edmonton, Alberta for supplying this guide to fitting goalie equipment. In this guide we will cover:
- Fitting a goalie helmet
- Fitting a goalies chest combo
- Fitting goalie pants
- Fitting goalie pads
- Fitting a blocker and glove
- How to select a goalie stick
 Goalie Helmet Fitting
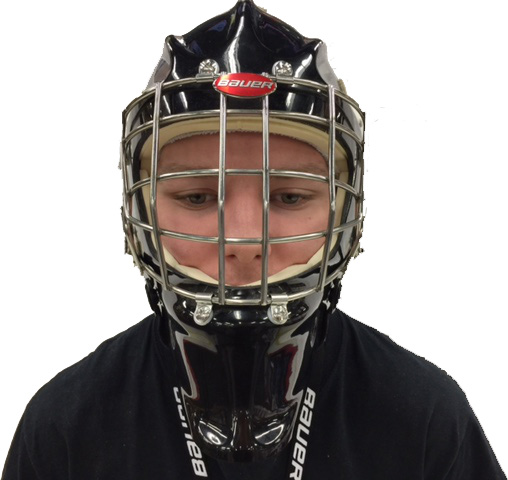
The goal mask is arguably the most important piece of equipment a goaltender wears. Therefore, ensuring a proper mask fit is vital to protection from injuries and concussions. A correctly fit mask will fit snug, not tight, around all aspects of the goaltender’s head, while allowing little-to-no wiggle room when the goaltender shakes their head.
There are 3 important keys to look for when fitting a goal mask:
1. The mask is flush with the forehead and does not leave any gap.
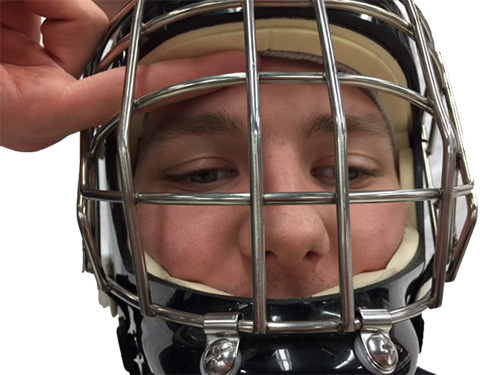
This ensures that the crown of the head is secure and the mask offers no movement forward or backwards across the head. To test this, simply insert a finger through the cage and gently run it across the goaltender’s head where the opening of the mask sits above the eyebrow. If a finger can be inserted between the mask and the forehead, this indicates the mask may be too small, and a larger mask will offer a wider crown, allowing the goaltender’s head to sit deeper in the mask.
2. The mask is snug against the cheeks, again, not leaving any gap.
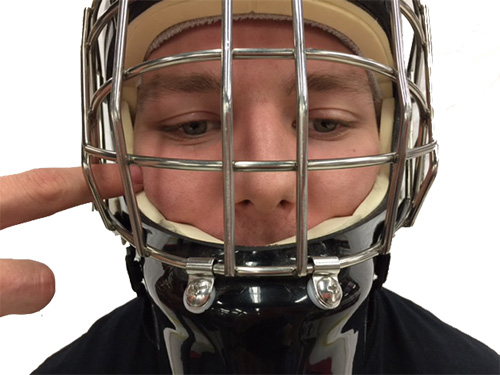
If the mask is too wide in the cheeks, the mask will move when the goaltender shakes their head side-to-side, and this movement could mean risk against injuries or concussions. A mask that is too tight against the cheeks will cause a “chipmunk” appearance, and will be extremely uncomfortable for the goaltender. Further, this can limit breathing and communication, so ensure the cheeks are snug. To test, grab the mask by the chin and ask the goaltender to move their head side-to-side. Your hand should not move while this occurs. If the goaltender’s head moves substantially in the mask, the mask is too big and therefore does not offer proper protection.
3. The backplate of the mask should sit inside the shell, not exposing any of the back of the head.
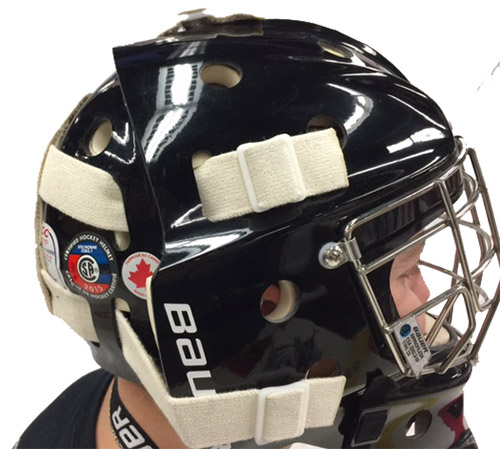
If the head is exposed, this offers open skin to be cut by a stick or skate. If the back of the head is exposed, the mask is too small. To fit properly, tighten the straps incrementally in order to see if the backplate can be brought inside the mask while not being too tight for the goaltender’s head. A common error that can cause an open backplate is having the chin cup too tight. Loosen the chin cup and this will allow the goaltender’s head to sit deeper in the mask.
All goal masks at the minor hockey level require CSA certification, as indicated by the sticker on the backplate. All masks should be worn at home for a period before being used on-ice, because CSA certification is only valid for the original goaltender, and if a mask has been used on-ice, the mask cannot be returned or resold. All private sales of goal masks void CSA certification.
Fitting a Goalies Chest Combo
The chest combo is another extremely important piece of equipment for a goaltender’s protection, as the goal of all goaltenders is to make every save in the middle of their chest. Therefore, a proper fitting chest combo is extremely important.
There are 2 important keys to look for when fitting a chest combo:
1. The length of the combo should cover the hipbones, with an ideal length of the goaltender’s belt line.
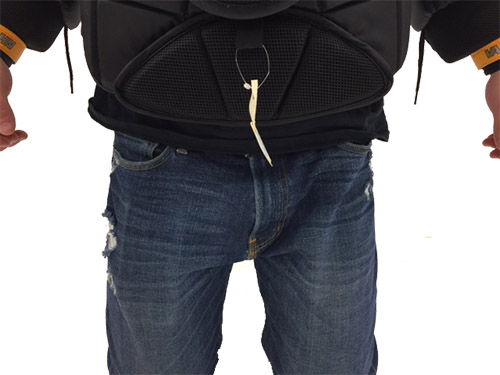
Any longer and the combo will stretch onto the legs, restricting movement. Anything above the hipbones will create a gap between the combo and the pants, and offer exposure across the lower belly area.
2. The arm length should cover the wrist bone
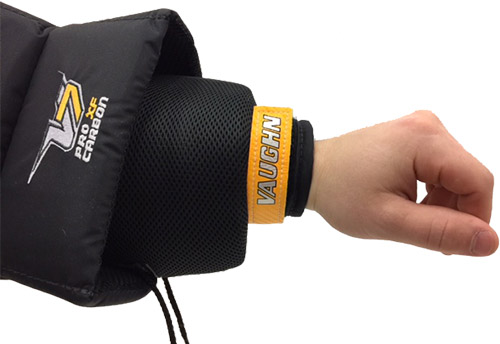
The shortest the arms should ever be is 2-3 finger widths above the wrist bone. Any shorter will create a gap between the arm and the hand, and expose skin for potential pucks and skate cuts. The arms should never stretch onto the hand itself. If the arms are too long, the goaltender will not be able to put on their gloves and their hand movement will be restricted.
A common area of concern is the open neck of a chest combo. While too much exposure is a concern, there is a standard amount of area that should be exposed. This is to allow the chin of a goaltender’s mask to get tighter to their chest in order to look into their feet when required. To cover this, the goaltender should always wear a proper BNQ certified neck guard, specifically a goalie neck guard with a protective bib.
Goal Pants Fitting
Goal pants are much bulkier and restricting than a standard player pant. With increased padding between the legs and across the hips, movement is reduced while protection is increased. Due to this, the goaltender can wear a player pant until approximately Peewee level hockey, to encourage movement and allow them to gain a better understanding of saves without reduced range-of-motion.
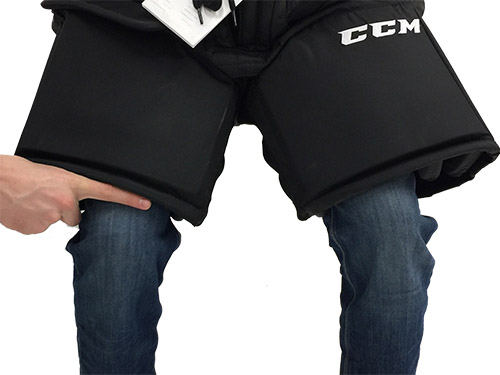
When fitting a goal pant, there is only one major key in terms of fit: the leg length. A perfect fitting pant will sit 1-2 finger widths above the top of the kneecap when the goaltender is in a squat position. If the pant comes onto the kneecap, the pant will be too long and interfere with the goal pads. A pant that is too small will be approximately a hand width above the kneecap, creating an exposure when the goaltender moves into the butterfly position.
Waist size is entirely up to the goaltender. While some goalies may still like the pant to be tight on their waist, it is becoming more common for a pant to be worn loose in order to increase movement and net coverage. Suspenders are a simple fix for a goaltender wanting the best of both worlds.
Goalie Pad Fitting
Goal pads are sized numerically rather than by standard “Small, Medium, Large, etc.”. This number is the measurement from the toe of the pads to the top of the thigh, in inches. However, nearly all pads for the past decade come with a standard +1 or +2 sizing. This refers to the additional height added to the top of the thigh on the pad. For example, a 34+1, 34+2, and 34+3 will all have the identical shin length and knee placement, but the thigh length above the knee increases. This allows for a more personalized fit for goaltenders with different leg shapes and sizes.
The 2 major keys when fitting a goal pad are as follows:
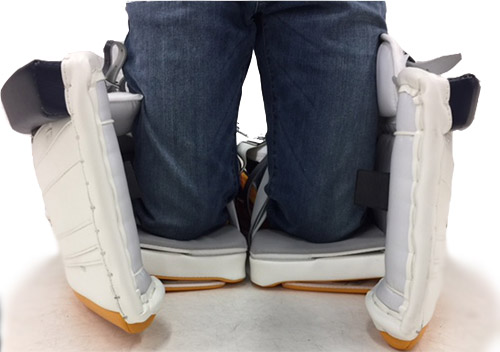
Knee placement. The modern goaltender is taught the butterfly save and style from early on. Because of this, the goaltender will spend a lot of time on their knees, and ensuring their knee is properly placed in the cradle will reduce the risk of a goaltender injuring their knees when dropping to the ice.
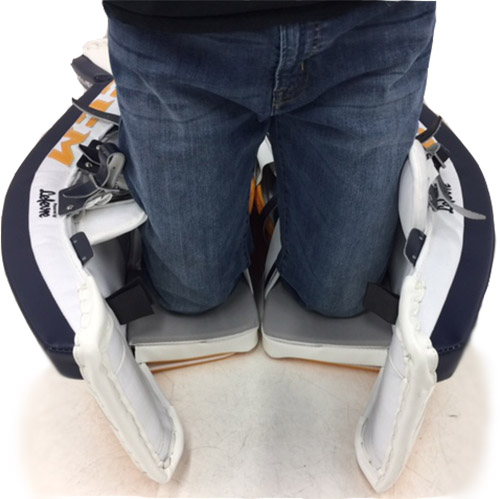 To test sizing, have the goaltender do up all the straps on the pads, exactly how they would in a game. Have the goaltender drop to a butterfly, and hold the position. While they are still, ask them to gently click their heels together, to allow for a better view of the knee placement. The middle of the goaltender’s knees should land in the middle of the knee cradle, allowing for optimal fit and weight distribution. If the goaltender’s knees are towards the top of the knee cradle, they will outgrow the pads in a short period of time.
To allow for growth room, the goaltender’s knees should land in the bottom 1/3 of the cradle, no lower. If the knee is too low, it will slide out of the cradle and slam against the ice.
Thigh height

Have the goaltender stand with their legs together for this measurement. This is a more personal-feel fit, as some goaltenders will prefer a taller pad while others may want shorter. An ideal fit is 2-3 inches above the middle of the thigh. Any higher and the pad will come up into the bend of the leg/bottom of crotch and will restrict skating movement. If the pad comes below the middle of the thigh, the five-hole may not be covered and the knees could be exposed to sticks and pucks.
Strap tightness is entirely preference-based. Historically, the pads were to be tight to the goaltender’s legs in order to move easier. However, currently goaltenders are loosening their straps to increase pad rotation in the butterfly. A good rule of thumb to follow is that the boot strap on the bottom of the pads should be loose in order to allow skate movement, the calf straps can be either snug or loose, and the knee/thigh straps should be loose to allow rotation.
Trappers & Blocker Fitting
Trappers and blockers only come in 4 sizes: youth, junior, intermediate, and senior. Because of this, fitting is fairly simple. Have the goaltender put a blocker glove on their hand and turn their palm to the sky.
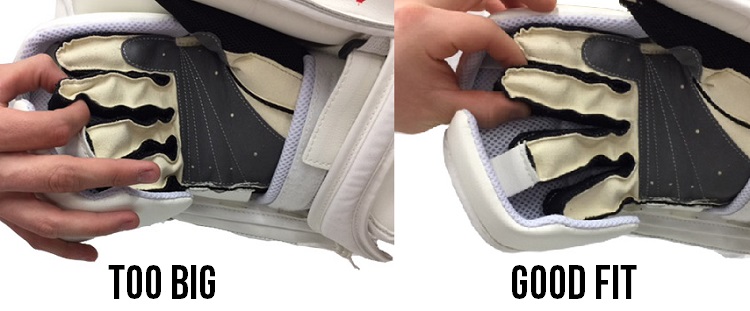
Pinch the ends of the fingers to feel for the gap/growth room. There should be no more than a pinch of the fingers. Any more room and the goaltender will have difficulty holding the stick. A quick test for room is to place an un-taped stick on the ground and ask the goaltender to pick it up. If they are able to do it without difficulty, the blocker fits. Once you have found a blocker size that fits, the corresponding size for the trapper will also be correct.
Selecting a Goalie Stick
One of the most commonly incorrectly sized pieces of equipment is the goal stick. Goal sticks only range from 21” to 27”, meaning that a goaltender does not increase in stick size every time they grow an inch. In order to fit a goal stick, have the goaltender get into their goal stance, without skates on. Because the stick is not on the ice for the entire game, it is not vital to test with skates on. When the goaltender goes into their stance, ensure the blade of the stick lies directly in the middle of their feet. A stick that is too big will be shifted toward the far leg, while a short stick will shift toward the close leg. The blade should also be evenly flat on the floor, not tilted with the toe or heel upward.
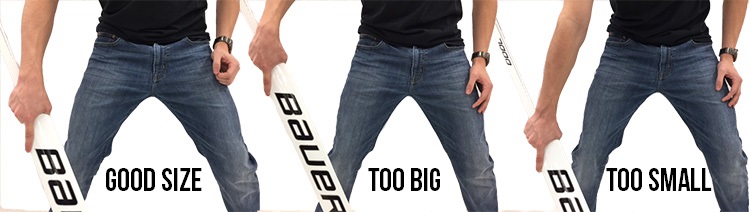
When the blade is in the correct position, the hand should be mid-thigh. Too high will create a large gap under the goaltender’s arm, while a stick too small will cause the goaltender’s shoulder to drop and open up space on the blocker side.
Where to Buy Goalie Equipment
If you’re in the “just browsing” phase of shopping check out Goalie Monkey for a massive selection of gear. You can get an idea of pricing, styles, and brands available. Once you have an idea of what you like, it’s a good idea to head to a store and try the gear on. If you’re REALLY set on equipment, call ahead to see if it’s in stock in your size. If you’re looking for a deal on gear try the Goalie Monkey clearance section or local classifieds.
If you’re in the Edmonton Alberta area you can visit our friends at United Cycle (they wrote this guide). Otherwise look for a hockey store that specializes in goalie equipment nearby. For Canadians Pro Hockey Life is a good option both online and in stores and Hockey Monkey also has some retail locations in Canada and the USA
Links for Goalies
- Online Goalie Stores
- Goalie Monkey
- Pro Hockey Life Goalies – For Canadians
- Goalie Communities
For deals on goalie gear visit our site sponsor below
